

Master the Art of the Sear
Stop "graying" your steaks and start searing them.
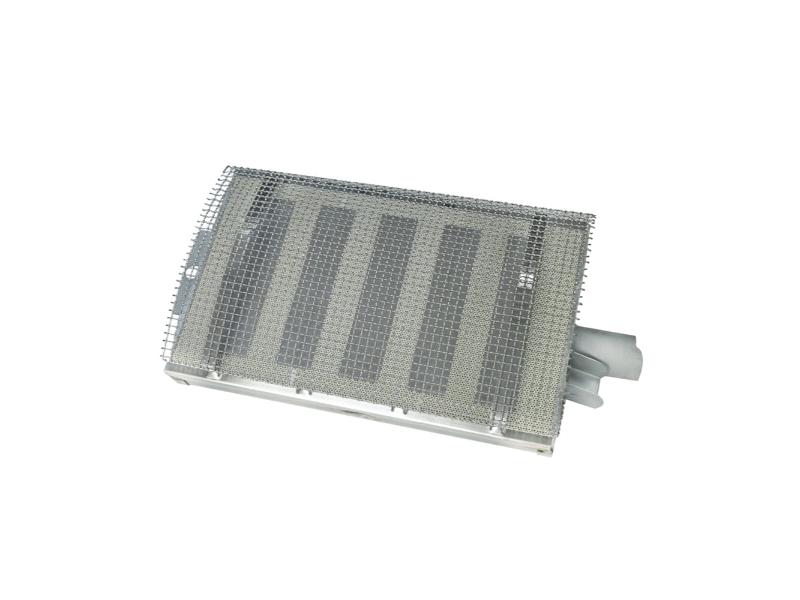
Transform one zone of your Broilmaster Stainless Grill into a high-performance searing station. The BSAVR is a direct-replacement burner engineered to swap seamlessly with a standard Bow Tie burner, giving you dual-cooking capability in one firebox.
- Intense Radiant Heat: Reaches searing temperatures significantly faster than traditional convection burners.
- 18,000 BTU Output: Pure power designed for rapid surface browning and professional grill marks.
- Plug-and-Play Integration: Custom-engineered for the G-Series Stainless lineup—no permanent modifications required.
- Flavor Retention: High-heat radiation reduces the "drying out" effect of moving hot air, keeping proteins succulent.
🔥 Pro-Tip for the Perfect Steak: For thick-cut steaks, use your standard Bow Tie burners to bring the meat up to an internal temperature of 115°F on indirect heat. Once reached, move the steak to the Infrared Sear Burner for 60 seconds per side. This "Reverse Sear" method ensures an edge-to-edge pink interior with a crunchy, professional crust.
Compatibility & Specs
INFRARED SEAR BURNER INSTRUCTIONS
|
Component |
Specification |
|
Model Number |
BSAVR |
|
BTU Rating |
18,000 |
|
Compatible Grills |
Broilmaster G-Series Stainless (BSG262, BSG343, BSG423) |
|
Material |
Ceramic & Stainless Steel |
Maintenance Pro-Tip
Keep it Clean: Infrared burners rely on thousands of tiny ceramic ports. To keep them from clogging, never use marinades or sauces directly over the infrared burner. If a spill occurs, turn the burner on High for 5 minutes after cooking to burn off any residue. Never use water or liquid cleaners on the ceramic tiles.
Quick-Start Guide
Converting your G-Series Stainless Grill into a professional searing station is a straightforward process that requires no special tools. Follow these steps to swap your standard Bow Tie burner for the high-output Infrared Sear Burner.
Step 1: Safety First
- Ensure the grill is completely cool.
- Turn off the gas supply at the source (tank or natural gas valve).
- Open the grill lid and remove the cooking grates and the flavorizer/vaporizer bar over the burner you wish to replace.
Step 2: Remove the "Bow Tie" Burner
- Locate the hitch pin (or clip) at the back of the existing stainless steel Bow Tie burner.
- Carefully remove the pin and lift the back of the burner.
- Slide the burner backward to disengage the venturi tube from the gas valve orifice at the front of the grill. Lift it out and set it aside.
Step 3: Slide in the BSAVR Infrared Burner
- Position the Infrared Sear Burner so the venturi tube (the neck of the burner) aligns with the gas valve.
- Slide the burner forward, ensuring the gas valve orifice is seated securely inside the venturi tube.
- Lower the back of the burner onto the mounting bracket.
Step 4: Secure and Test
- Re-insert the hitch pin at the back of the burner to lock it in place.
- Important: Visually check that the igniter electrode is positioned correctly (approx. 3mm to 5mm) above the ceramic surface of the infrared burner.
- Turn on the gas and perform a leak test if necessary. Light the burner to ensure a glow across the ceramic tiles.
Step 5: Replace Grates
- Replace your cooking grates. Note: You do not need the flavorizer bar over the infrared burner, as the ceramic tiles act as the heat distributor.